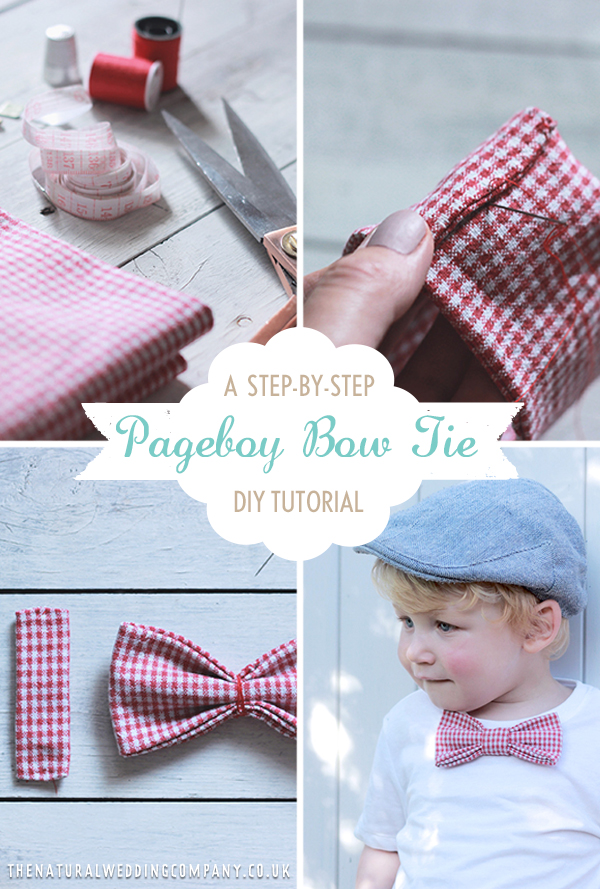
Today I have created a lovely and simple pageboy bow tie DIY tutorial. Being a mama to a little boy I sometimes find the outfit choices a little limiting compared to the options for girls. For a celebration however I don’t think there is anything more adorable than a boy in a bow tie – paired with some braces, a flat cap, or blazer you can’t really go wrong.
These bow ties are so simple and easy they would be perfect to make for little pageboys, and the advantage of making them yourself is you can choose any fabric that compliments the rest of your wedding party. I chose a red gingham fabric but you could choose any kind.
The tutorial today has been adapted from one by Slow Mama which I used a couple of years back when my little one was a baby. Now he’s a little older I made a couple of small changes to suit a family wedding we had this summer. You really don’t need to be a pro seamstress to make one, I am most definitely not!
What you need to create a pageboy bow tie

What you will need:
- Fabric (at least 25cm x 20cm)
- Complimentary thread & needle
- Sewing machine (optional)
- Scissors (material scissors preferable)
- 2 x small safety pins
- Tape measure
- Iron (optional but helpful)
Making your pageboy bow tie

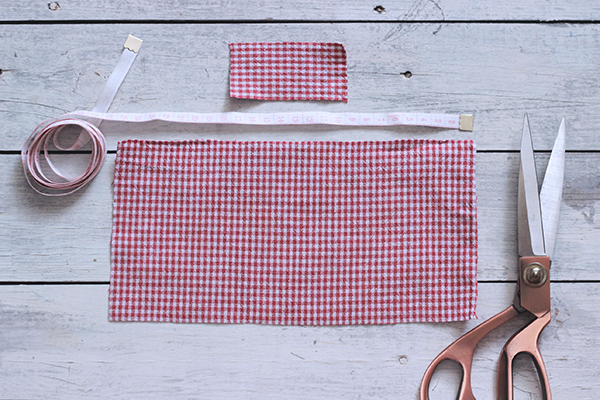
Step 1 – Cut the fabric
Cut the two pieces of fabric required to make the bow tie:
- Piece 1 – 25cm x 12cm
- Piece 2 – 8cm x 4cm
As my fabric was chequered it was easy to follow the lines. If you are not confident in cutting the right sizes in a straight line, make the templates out of paper/newspaper first and trace onto the fabric.
Step 2 – Creating the bow tie
Take the bigger piece of fabric and fold in half length ways, iron the fabric to help it keep in place.
Stitch along two of the open edges, leaving one of the shorter edges free. You can either do this with a sewing machine or by hand.
Cut the corners off diagonally – this will help it sit flat when you turn it inside out.
Turn the fabric inside out and stitch along the open edge

Join the two shorts end, overlapping them and stitch them together to create a loop. The stitching does not need to be neat as you will not see it.

Lay the loop flat with the stitched ends sitting in the middle. Iron to help keep its shape.

Holding the bow tie by its centre with the stitching held at the back, pinch it in the middle.
I pushed the middle to the front, and folded the edges down to meet the middle. Slow mama folded hers in the opposite way, so it just depends on your preference on how you would like the front of it to look.

Stitch down through the folds in the middle to pull them all together, stitch back through a couple of times and all the way around the whole middle. Again this doesn’t need to be neat as this will be covered up by the second piece of fabric.


Step 4 – Creating the middle piece of the bow tie
Now take the second piece of fabric to create the middle of the bow tie. Fold down the two shorter lengths of fabric and iron down to help hold in place.
Then fold the longer lengths to meet in the middle and iron (this bit can be a bit fiddly).

Roughly stitch at the the two shorter ends to hold down the longer lengths

You now have the two pieces to make the final bow tie.

Step 5 – Putting the bow tie together
Take the smaller piece of fabric and wrap it around the middle of the bow joining at the back of the bow tie. You will want to make sure it is wrapped quite tightly so that it doesn’t spin around the middle.
With the ends overlapping stitch them together. As this will sit at the back of the bow tie it doesn’t need to be really neat.

Step 6 – Attaching the fastenings to the bow tie
All that is needed now is to attach the safety pins to the bow tie.
(The version I made previously had poppers which you also sewed to a babygro/t-shirt. I sewed the poppers to two babygro’s in case one got messy, which is very likely with a little one. Now my son is a bit older I felt safety pins would be a better alternative as I could attach it to any clothing that I could convince him to wear on the day.)
Position a safety pin on each side of the back of the bow tie in the top third of the bow tie. I suggest sewing them to the top third of the bow tie as this would combat the weight of it potentially flopping forward if you were to sew the safety pins to the middle.
Stitch along the edge of the safety pin that doesn’t open.

Sew the safety pins opening in the same direction for ease of pinning.


The finished bow tie
And there you have it one page boy bow tie ready to attach to their outfit.

All you need now is a willing participant to wear it…

Hopefully you found this tutorial easy to follow, let us know if you have a go at it and if you have any questions just drop us a comment.

Categories: DIY + Inspiration
Tags: bow tie > DIY project > diy wedding ideas > handmade wedding > pageboy
hilary on 20. September, 2016
What a lovely idea. The instructions are very clear and easy to follow.