
DIY guide to making your own giant light up letters
It is so lovely to be back with TNWC Real Bride Ellie today after a bit of a gap in posts. I have just this week been contacting a handful of (hopefully!) new TNWC Real Brides to introduce you to. Today we have a Real Brides first – a groom-to-be has written this fab post (thanks Jon!), which details how him and Ellie created a set of giant light-up letters for their up-coming wedding.
Over to Jon to tell you how to create them…
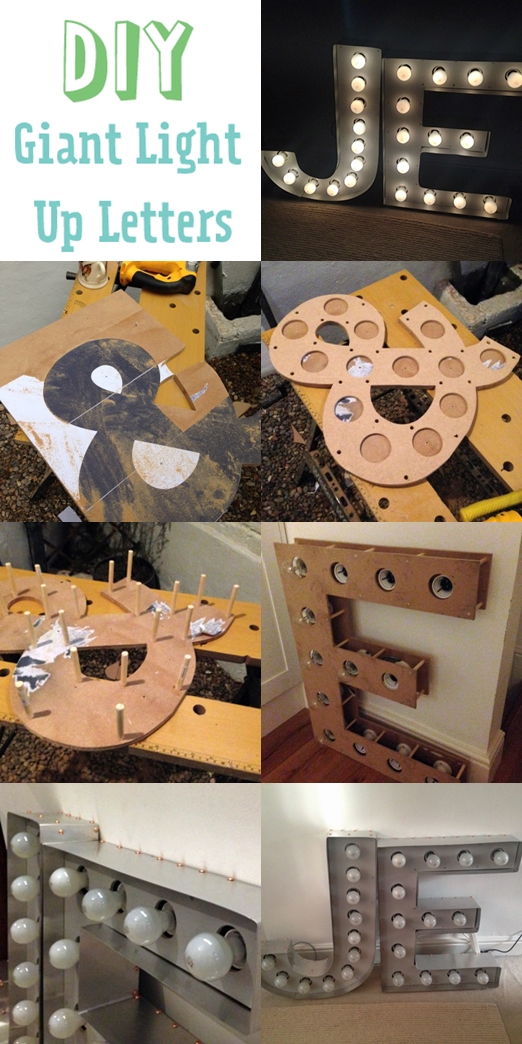
A how to guide for making giant light up letters
We were looking for giant light-up letters that we want to hang at the end of the field when we get married in May – a huge ‘J & E’ to welcome everyone to the party. However, each letter cost nearly £200 each to buy – and not much less to rent. This was way out of our budget. However, I was a bloke looking for a blokey wedding job – and confidently proclaimed that they’d be easy enough to make. It turns out (fortunately) that it was actually quite simple!
I’ve included a step-by-step on how to do it below. It is significantly cheaper to build them yourself – all three letters’ raw materials came to about £150 (mostly electrics), and they take a bit of time to put together, but if you’re like me and enjoy pottering around outside with a cup of tea and some power tools, then read on!

What you need
For each letter you’re going to need:
- 2 sheets of MDF (660mm wide worked for me) – 1x 10mm thick, 1x6mm thick
- Plenty of 8mm dowel rod
- c.15 Batten lamp holders (Wickes do the cheapest)
- c.15 low wattage bayonet light-bulbs (I went with 30W as I didn’t want to blow the electrics! You want the pearl-effect old fashioned type – the halogen versions will look too bright)
- c.10m 3-strand flex and a plug
- 130mm aluminium sheet (Best place for this is the Aluminium Warehouse, who deliver. The thing to look for is Aluminium Sheet: 1050A H14 – 0.9 mm)
- Studs to hold the aluminium in place (I used round-headed copper tacks)
- You’ll also need some spray mount glue, a jigsaw, a (100mm) hole drill, various tools for wiring such as wire strippers and pliers, and a big rubber mallet. And some outside space. However tempted you are, do not do this inside unless you want to be hoovering sawdust until your first anniversary.
Getting started
First up, go onto your computer, and in Microsoft Excel make a letter as big as you need. To do this, paste your letter as an image, and then right click on it. Under ‘Size’, change to the dimensions you need. Remember that the maximum width is governed by the width of your MDF sheet! Then print it off – Excel lets you print one big image onto a load of sheets of paper, which is just what you need.
Line all the sheets up, and use the spray mount to stick them onto the THICKER sheet of MDF. Once you’ve done that, use a 4-5 small nails / panel pins to attach the two sheets together (through the body of the letters – not through the waste) and hold them in place – thicker one on top. You’ll end up with something like the photo…
Cutting
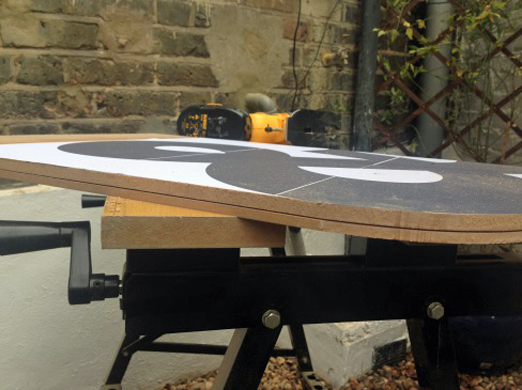
This is the really messy bit. Use your jigsaw to cut around the letters. Try not to breathe too much as you do this! For the fiddly bits – like inside this ampersand – drill a 10mm hole in white area and work your saw out from that. Have a cup of tea – you’ll be parched at the end of this.
For straight edges (ie, an “E”), consider using a straight piece of timber clamped to your bench to use as a guide to make sure you get a nice straight line.

Don’t sweep up just yet. Take your 8mm dowel, and cut it into 85mm lengths. You need a lot – roughly 25-30 per letter.
Once you’ve cut them, get a pencil sharpener (one of the two-hole versions that you had at school – yes, you finally have a chance to use the bigger hole!) and ‘sharpen’ both dowel ends with just a single rotation of the sharpener. You should have a small but obvious bevel on each end.

After that, your fingers will be a little sore – so it’s time to give them a rest and to pick up your pencil, ruler and measuring tape.
Drilling
Turn the two still nailed-together sheets over (so your letter is backwards). Now you need to measure up the holes for the lightbulbs to stick out of. It’s hard to give much advice on this.
Best thing to do is to put a pencil dot in the middle of each ‘intersection’ (the & has two) and work around from there, marking a pencil dot at even spacing, exactly half way between the outside and inside edges. How close or far apart you have them is up to you – it depends how many lights you want! Mine were about 20cm apart from each other.

Now take your hole drill, and drill through those pencil marks. You only want to cut a hole in the THIN sheet, so don’t go too deep! This bit is really satisfying. The offcuts make great little wheels for toy cars if you have any small people interested in what you’re doing!
You’re not quite done drilling yet. Now take a 7mm drill bit, and drill some small holes along the edges and corners of the let (you can see these in the picture). Go all the way through with these ones – you’ll need them to hold the dowel you sharpened about 45 minutes ago!
Now you can prise (gently) the two sheets apart – you should have something that looks reassuringly like it might become a 3D letter in the near future!
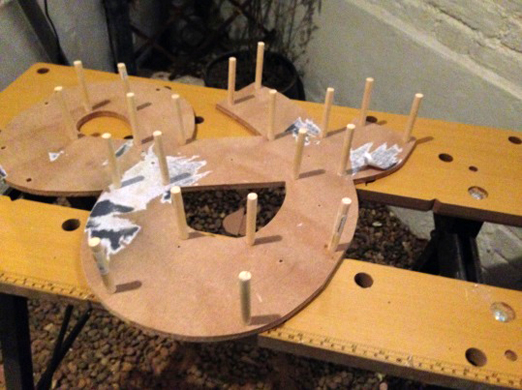
Put the thin sheet with holes in to one side, and pop the thicker one on your bench. Peel off as much of the paper as you can, and then take your big rubber mallet, and whack dowels into all the little holes you drilled just now. I didn’t supplement with glue – although you may want to. It should look like a bit like an alphabetical hedgehog. See picture above for an example!
Next up, it’s time to pour yourself a glass of wine and move inside. The next bit isn’t messy, and you’ll need decent light levels and a certain amount of patience!
Wiring
Batten lamp holders have three terminals on the back – and helpfully, two of them are marked with a little letter ‘L’ (live = brown wire) and ‘N’ (neutral = blue wire). The other, unmarked one is the earth (green and yellow wire).
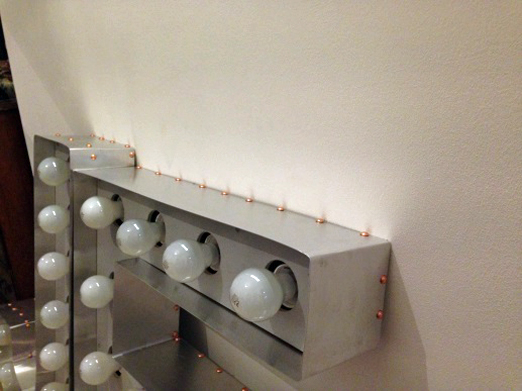
Rather helpfully, when you drilled your big holes you will have unavoidable put the guide bit through the thicker back sheet. This gives you a perfect centre mark for each of your batten holders, and also shows you how long bit of flex you need to cut should be. Each batten holder is connected to the next by a short piece of flex – hopefully the picture makes this clear.

Take two lengths of flex, with the ends stripped, and twist the same colours together. Then fasten this into the correct terminal in the back of the batten holder, which you will have needed to disassemble to access the screws. Once all six wires are secure, put the light fitting back together. Use a pair of pliers to crack a hole in the plastic base for the cables to pass through (these are usually already scored), and then screw the holder down onto your MDF – make sure that it’s exactly central over the hole you drilled.
Do this as many times as you need to. Remember, I said you needed patience?! Also remember that some junctions (here, between the middle bar and the spine of the E) will need more than two cables – three is tricky but achievable (it’s nine bits of wire, and you have to be pretty brutal as you screw it down as there’s not much space behind there!), but don’t even attempt more than that.
Lastly, make sure that you drill a hole in the back board for the power cable to go through. Because the lights are all connected to one another, this can be off any. You can see this in the picture here.

It goes without saying that you should be careful with all of this. Make sure all wire is properly insulated, don’t even think about turning the power on with bare cables around, etc. etc.
Now it’s time to wire the plug – and you have a working set of lights! You’ll need a 5A fuse unless you choose to use LEDs. Remember GCSE Physics – P=IV? 15x30W bulbs at 230V means you’re drawing nearly 2 amps. A 3 amp fuse might blow when you turn them on…
Pop a lightbulb in all of them to check. Then take the bulbs out again – otherwise you’ll smash them all in the next step!
Putting your letters together
Return to your mallet. Go back outside, and lay the thin sheet with the holes in on top of your dowel hedgehog. Line up the small holes, and give the MDF a tap with the mallet until the down is flush with the outside surface. This takes a bit of time, as you’ll find that as soon as you tap one bit, another dowel pops out. It’s like splat the rat, but persevere – they’ll all go in in the end!
We used a rubber mallet so you don’t damage the wood. You could use a hammer but I suspect you might end up breaking everything!

Painting
Next up’s the easy bit – give the front and back a couple of coats of paint. Colour is obviously completely up to you. Play around with distressing it by attacking with some course sandpaper if you feel like it. Or use gloss and have a lovely shiny letter. Go wild…
You’ve more or less got a finished letter now – how good does that look?!! We then set ours up in the sitting room and used them as a heater. 40x30W lightbulbs makes for a decent amount of heat! That’s why you don’t want to go much higher – 60W would probably be a little dangerous!
The finishing touch
However, there’s one more step to make them look really good. So good, you’ll be wondering where to put these giant letters in your garden after your wedding!
The aluminium sheet that you bought is razor sharp – so be a bit careful. I got cuts all over the backs of my hands.
You want to take a length of it, and use a centre punch to mark holes about 10cm apart from each other, 5mm from one of the edges. These will be used to guide your tacks. We chose copper tacks and aluminium sheet as we liked the combination. You can get all sorts of tack colours and styles, and you can even get copper sheeting – though you’ll need to have deeper pockets than me to take that route!
Carefully stand your precious letter on its end. Then hold up your aluminium so that the edge with the punched dents in is perfectly aligned with the back edge of the letter. Pick a nice straight edge to start with if you can – like the spine of the “E”, or to-right of the “J”.
The 5mm centre punch holes you made from the last step will now therefore line up with the mid-thickness of the back sheet. Take a tack, and hammer home into the base sheet. It gets easier once a couple are in place, though you’ll have to start wrestling with corners and curves!
Each letter has its own issues and difficulties that you’ll have to deal with. I envy anyone with I as their initial – it would be so easy! E was pretty straightforward as there aren’t any curves, but the “&” was an absolute nightmare! Especially the middle pieces – I couldn’t get tacks in there so had to use glue. Your rubber mallet will come in handy again – it’s good for bashing the metal round corners etc. without denting it.
When you run out of your first metal sheet, pick up the next one and do the same again. You’ll have to cut the last piece to size with a pair of tin snips so that it fits. I used kitchen scissors. Don’t – I then had to throw them away!

And there we are! We’re really pleased with what they look like – I hope you are too!

 new TNWC Real Brides to introduce you to. Today we have a Real … Continued)
Categories: DIY + Inspiration
Tags: DIY project > giant light-up letters > handmade wedding > real bride Ellie > tnwc real brides